
Enhancing Real Estate Images
High-quality real estate photos play an important role in attracting potential buyers and facilitating quicker and more lucrative property sales. Professional photographs capture the property in its best light, showcasing its best features and creating a visually appealing presentation. High-quality images not only make listings stand out but also convey a sense of professionalism and attention to detail on the part of the seller or agent.

If you're in the real estate game, you've probably heard that a picture is worth a thousand words. Well, when it comes to twilight photos, they might just be worth a million. Twilight photography can make properties look stunning and inviting, setting them apart from the competition. Let's dive into why twilight photos are a game-changer for real estate and how you can nail them every time.
Why Twilight Photography?
Enhancing Property Appeal
Ever noticed how everything looks a bit more magical as the sun sets? That’s the allure of twilight photography. The soft, ambient light during this time can make any property look like a million bucks. The subtle blend of natural and artificial light highlights the best features, casting everything in a warm, inviting glow.
Capturing Unique Features
Twilight shots aren't just about making things look pretty—they're about showcasing a property’s unique charm. The warm glow from interior lights against the cool blue of the evening sky creates a captivating contrast that daytime shots simply can't match. It’s perfect for highlighting features like landscape lighting, pool lights, and interior coziness.
Technical Aspects of Twilight Photography
Best Time for Twilight Shots
Timing is everything in twilight photography. The best time to shoot is about 20-30 minutes after the sun sets or before it rises. This period is known as the “golden hour,” where the sky still has some color, but it’s dark enough for interior and exterior lights to shine.
Essential Equipment
To capture those perfect twilight shots, you need the right gear. A sturdy tripod is a must to avoid any blurriness from long exposure times. A camera with manual settings is also crucial, as you’ll need to adjust the aperture, shutter speed, and ISO to get the perfect shot. I also like to either wirelessly pair my tablet to my camera or use a remote shooting device to prevent any shake in the camera when pushing the shutter button.
Camera Settings and Techniques
Aperture and Shutter Speed
Set your aperture between f/8 and f/11. For shutter speed, longer exposures (around 1-2 seconds) can help capture the ambient light effectively. This balance ensures both the property and the sky are well-exposed.
ISO Settings
Keep your ISO as low as possible (100-400) to reduce noise in your photos. Low ISO settings will give you the crisp, clean images you need for high-quality real estate photos.
Staging a Property for Twilight Shots
Lighting Considerations
Lighting is key in twilight photography. Turn on all interior lights to create a warm glow. Exterior lighting, like pathway lights, garden lights, and pool lights, should also be on. These lights not only illuminate the property but also add depth and dimension to your photos.
Highlighting Key Areas
Make sure to highlight the property's best features. If there's a beautiful patio, a cozy living room, or an inviting entrance, make sure these areas are well-lit and tidy. A little staging goes a long way in making your photos look professional.

Post-Processing Twilight Photos
Basic Editing Techniques
Once you’ve got your shots, it’s time to edit. Basic adjustments like enhancing the brightness, contrast, and sharpness can make a big difference. Tools like Lightroom and Photoshop are great for these tweaks.
Advanced Editing Tips
For more advanced editing, play with the color balance to enhance the warm tones. Using gradient filters can help balance the exposure between the sky and the property, ensuring both are perfectly lit.
Common Mistakes to Avoid
Overexposure and Underexposure
One of the most common mistakes in twilight photography is improper exposure. Overexposure can wash out the colors, while underexposure can make the property look dark and uninviting. Use a histogram to ensure your exposure is spot on.
Ignoring Surrounding Elements
Pay attention to what's around the property. A beautiful house can be overshadowed by a messy yard or distracting elements like cars or trash bins. Clean up the surroundings to keep the focus on the property.
Benefits for Real Estate Agents
Attracting More Buyers
Twilight photos have a way of captivating potential buyers. They stand out in listings, attracting more clicks and views. A well-executed twilight shot can be the difference between a potential buyer clicking on your listing or scrolling past it.
Higher Property Value Perception
Homes that look stunning in photos are perceived to be more valuable. Twilight photos can create a luxurious feel, making buyers more willing to pay a premium. It's a small investment for a potentially big return.

Creating Twilight Photos in Photoshop
With all of the new features in editing softwares, you don't necessarily need to be present at a property during limited twilight hours to get the twilight effect in your real estate photos. Creating twilight photos in Photoshop is a powerful technique to enhance real estate listings by showcasing properties in a captivating light. This process involves using various editing tools to transform daytime images into stunning twilight scenes, highlighting the property's features against a beautifully lit evening sky. By manipulating elements such as exposure, lighting, and color balance, photographers can create visually appealing images that stand out in a competitive market. Utilizing Photoshop's advanced capabilities allows for precise adjustments and creative flexibility, making twilight photo editing an essential skill for real estate photographers looking to boost their listings' appeal.

Before
Here is the original photo of the exterior front of the home.

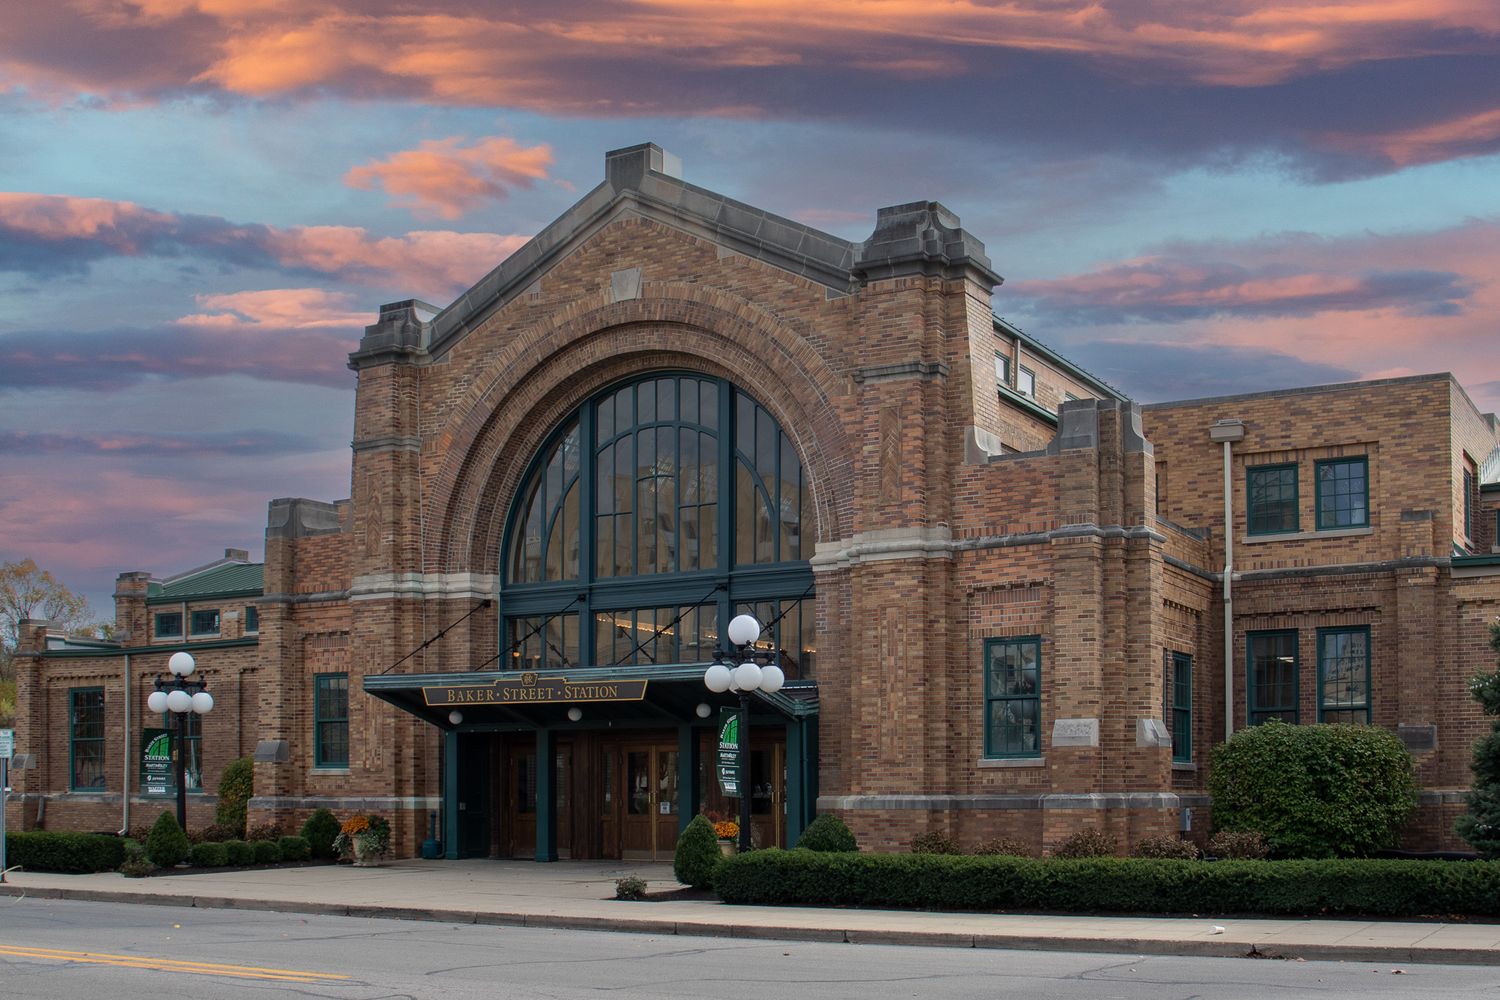
After
Here is the same image after using the "Sky Swap" feature in Photoshop.
Using the Sky Replacement feature in Photoshop is a straightforward process that can dramatically enhance your photos. To begin, open your image in Photoshop and navigate to Edit > Sky Replacement. This tool automatically detects the sky in your photo and allows you to choose a new sky from a built-in gallery or upload your own. Once you select your desired sky, Photoshop blends it seamlessly into the original image by adjusting the lighting and color tones to match the new sky, providing a natural and cohesive look.
After performing the sky swap, further editing can enhance the overall image quality. Fine-tuning the color balance and exposure ensures that the new sky integrates perfectly with the rest of the photo. Adjustments to the shadows, highlights, and contrast can help achieve a balanced and vibrant final image. Additionally, using tools like the Clone Stamp or Healing Brush can remove any distracting elements or artifacts left from the sky replacement process. These finishing touches ensure that the photo looks polished and professional.
Moreover, you can use additional features like gradient filters to subtly enhance the transition between the sky and the landscape. This can help create a more realistic blend. Adding or adjusting the vignette effect can also draw attention to the main subject of the photo, further improving its aesthetic appeal. By combining these editing techniques, you can create stunning images that captivate viewers and effectively highlight the beauty of the scene.
Twilight photography can transform the way properties are perceived. By capturing this magical blend of natural and artificial light, these photos highlight a property's best features and create an inviting atmosphere that daytime shots just can't replicate. With the right equipment, timing, and techniques, you can master the art of twilight photography and help your listings stand out.


